
Deploying Bigtrace on Kubernetes
NOTE: This doc is designed for administrators of Bigtrace services NOT Bigtrace users. This is also designed for non-Googlers - Googlers should look at go/bigtrace instead.
Overview of Bigtrace
Bigtrace is a tool which facilitates the processing of traces in the O(million) by distributing instances of TraceProcessor across a Kubernetes cluster.
The design of Bigtrace consists of four main parts:
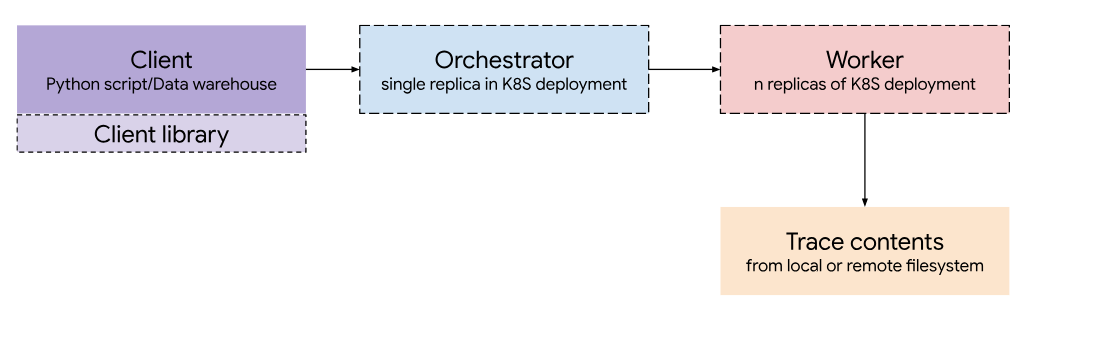
Client
There are three clients to interact with Bigtrace: a Python API, clickhouse-client and Apache Superset.
- The Python API exists in the Perfetto python library and can be used similar to the TraceProcessor and BatchTraceProcessor APIs.
- Clickhouse is a data warehousing solution which gives a SQL based interface for the user to write queries which are sent through gRPC to the Orchestrator. This can be accessed natively using the clickhouse-client which provides a CLI which allows the user to write queries to the DB.
- Superset is a GUI for Clickhouse which offers an SQLLab to run queries offering support for modern features such as multiple tabs, autocomplete and syntax highlighting as well as providing data visualization tools to create charts easily from query results.
Orchestrator
The Orchestrator is the central component of the service and is responsible for sharding traces to the various Worker pods and streaming the results to the Client.
Worker
Each Worker runs an instance of TraceProcessor and performs the inputted query on a given trace. Each Worker runs on its own pod in the cluster.
Object Store (GCS)
The object store contains the set of traces the service can query from and is accessed by the Worker. Currently, there is support for GCS as the main object store and the loading of traces stored locally on each machine for testing.
Additional integrations can be added by creating a new repository policy in src/bigtrace/worker/repository_policies.
Deploying Bigtrace on GKE
GKE
The recommended way to deploy Bigtrace is on Google Kubernetes Engine and this guide will explain the process.
Prerequisites:
- A GCP Project
- GCS
- GKE
- gcloud (https://cloud.google.com/sdk/gcloud)
- A clone of the Perfetto directory
Service account permissions
In addition to the default API access of the Compute Engine service account, the following permissions are required:
- Storage Object User - to allow for the Worker to retrieve GCS authentication tokens
These can be added on GCP through IAM & Admin > IAM > Permissions.
Setting up the cluster
Creating the cluster
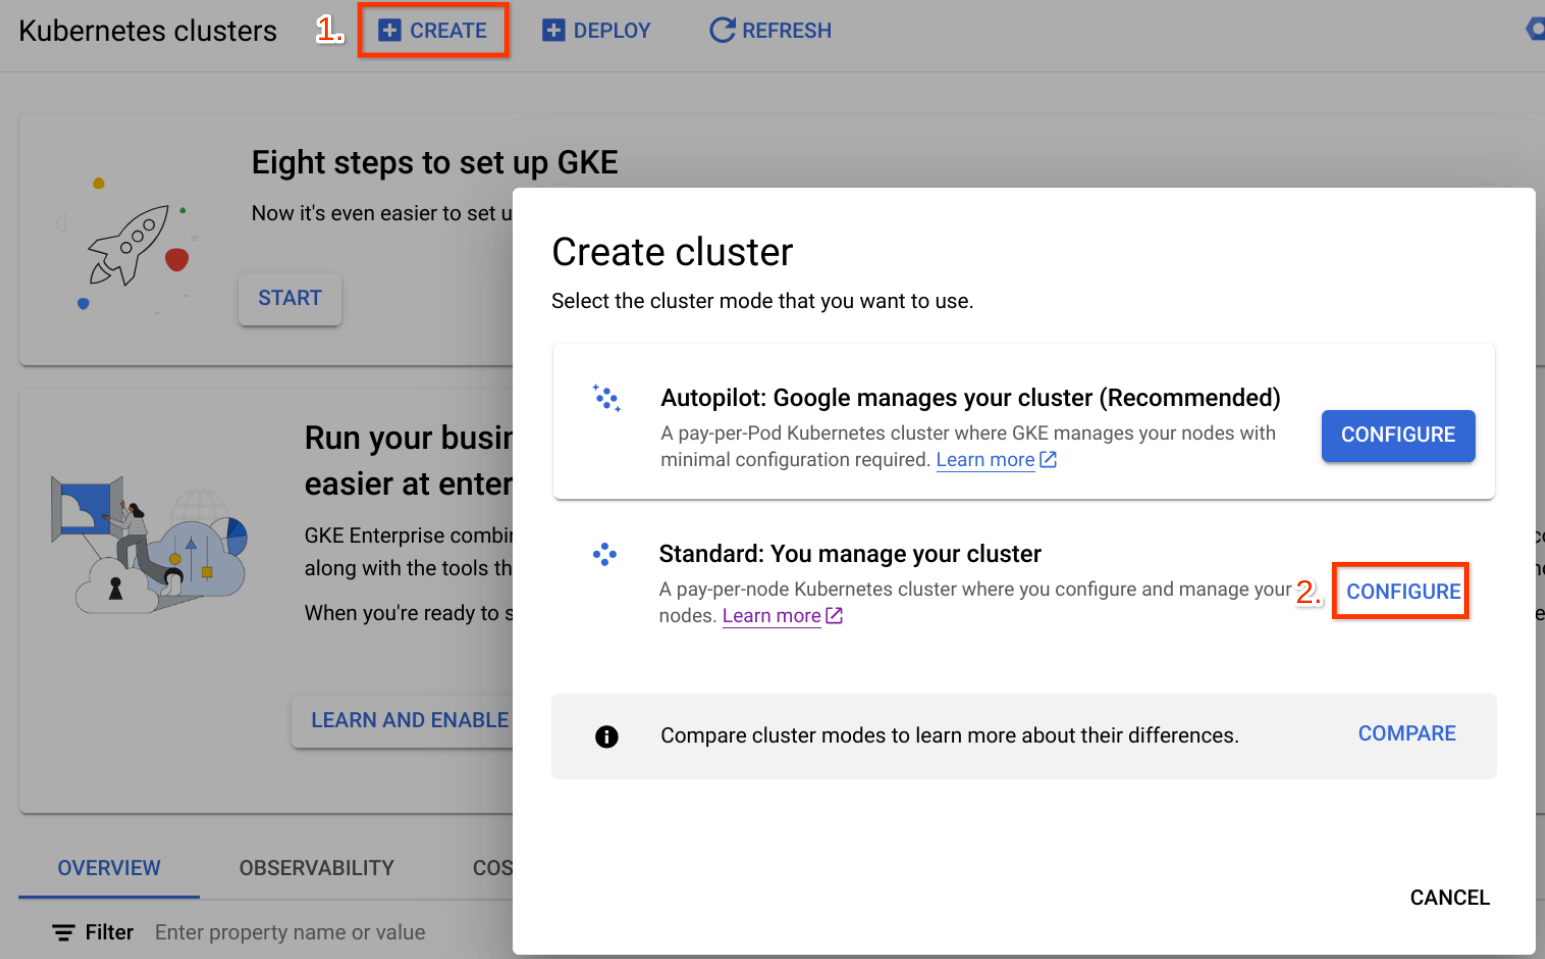
- Navigate to Kubernetes Engine within GCP
- Create a Standard cluster (Create > Standard > Configure)
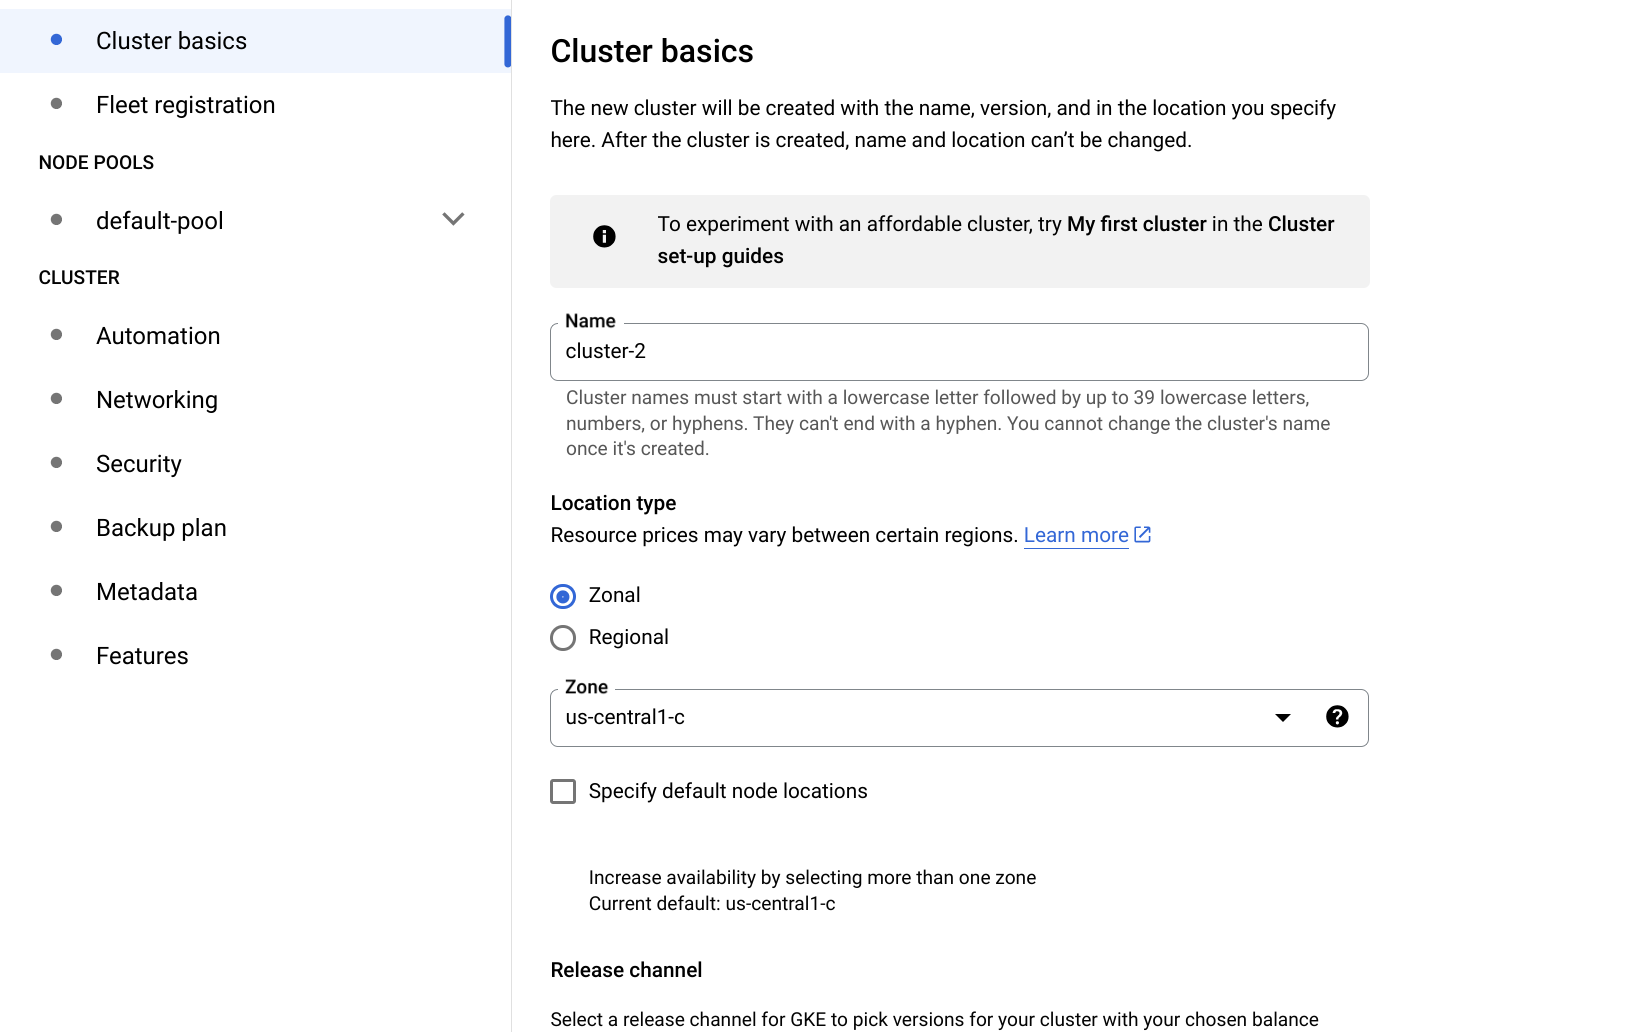
- In Cluster basics, select a location type - Use zonal for best load balancing performance
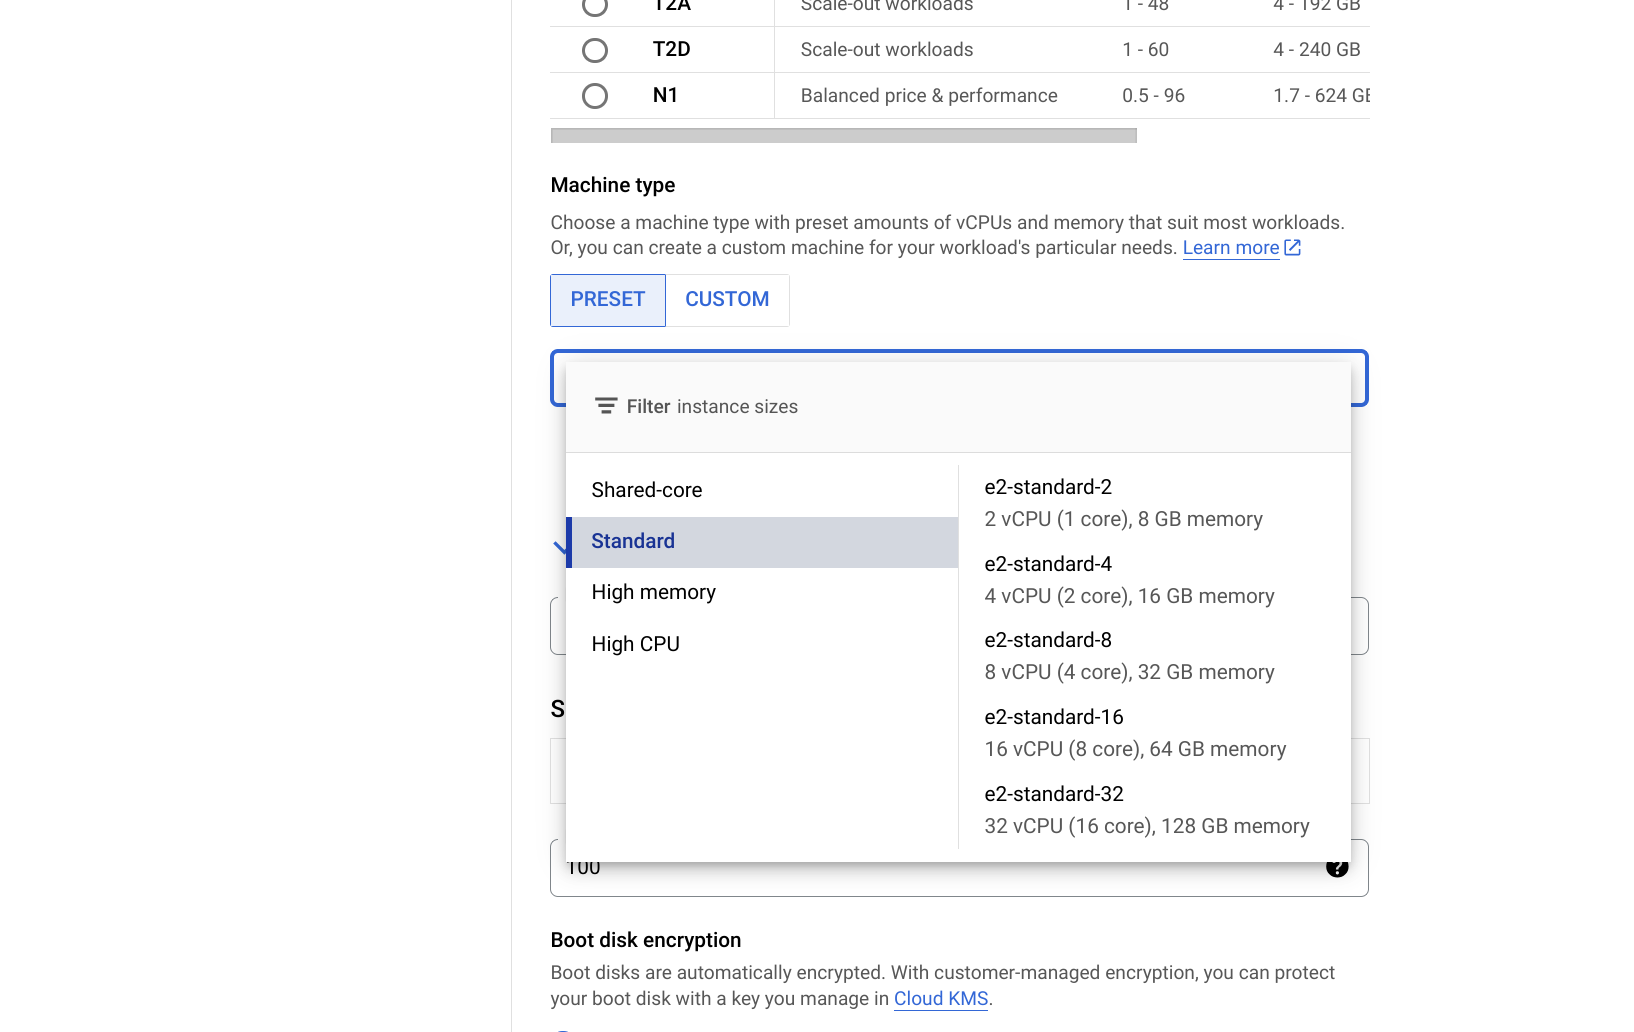
- In Node pools > default-pool > Nodes, select a VM type - Preferably standard - e.g. e2-standard-8 or above
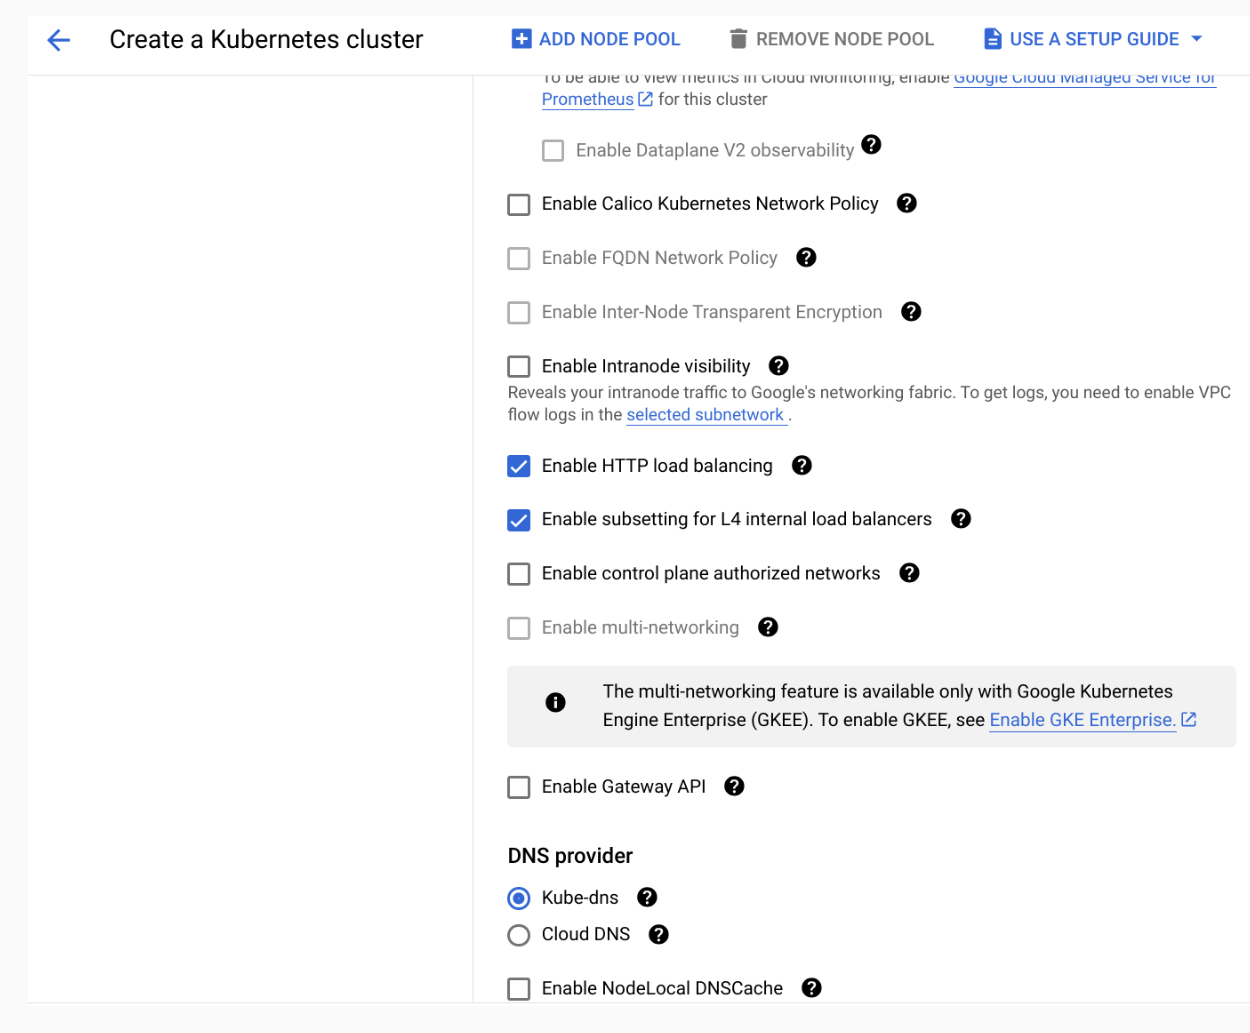
- In the Networking tab, enable subsetting for L4 internal load balancers (this is required for services using internal load balancing within the VPC)
- Create the cluster
Accessing the cluster
To use kubectl to apply the yaml files for deployments and services you must first connect and authenticate with the cluster.
You can follow these instructions on device or in cloud shell using the following command:
gcloud auth login

gcloud container clusters get-credentials [CLUSTER_NAME] --zone [ZONE]--project [PROJECT_NAME]
Deploying the Orchestrator
The deployment of Orchestrator requires two main steps: Building and pushing the images to Artifact Registry & deploying to the cluster.
Building and uploading the Orchestrator image
Configure docker to push into the Google Cloud artifact registry
gcloud auth configure-docker [ZONE]-docker.pkg.devTo build the image and push to Artifact Registry, first navigate to the perfetto directory and then run the following commands:
docker build -t bigtrace_orchestrator infra/bigtrace/docker/orchestrator

docker tag bigtrace_orchestrator [ZONE]-docker.pkg.dev/[PROJECT_NAME]/[REPO_NAME]/bigtrace_orchestrator

docker push [ZONE]-docker.pkg.dev/[PROJECT_NAME]/[REPO_NAME]/bigtrace_orchestrator
Applying the yaml files
To use the images from the registry which were built in the previous step, the orchestrator-deployment.yaml file must be modified to replace the line.
image: [ZONE]-docker.pkg.dev/[PROJECT_NAME]/[REPO_NAME]/bigtrace_orchestratorThe CPU resources should also be set depending on the vCPUs per pod as chosen before.
resources:
    requests:
      cpu: [VCPUS_PER_MACHINE]
    limits:
      cpu: [VCPUS_PER_MACHINE]
Then to deploy the Orchestrator you apply both the orchestrator-deployment.yaml and the orchestrator-ilb.yaml, for the deployment and internal load balancing service respectively.
kubectl apply -f infra/bigtrace/gke/orchestrator-deployment.yaml
kubectl apply -f infra/bigtrace/gke/orchestrator-ilb.yaml
This deploys the Orchestrator as a single replica in a pod and exposes it as a service for access within the VPC by the client.
Deploying the Worker
Similar to the Orchestrator first build and push the images to Artifact Registry.
docker build -t bigtrace_worker infra/bigtrace/docker/worker

docker tag bigtrace_worker [ZONE]-docker.pkg.dev/[PROJECT_NAME]/[REPO_NAME]/bigtrace_worker

docker push [ZONE]-docker.pkg.dev/[PROJECT_NAME]/[REPO_NAME]/bigtrace_worker
Then modify the yaml files to reflect the image as well as fit the required configuration for the use case.
image: [ZONE]-docker.pkg.dev/[PROJECT_NAME]/[REPO_NAME]/bigtrace_worker
...

replicas: [DESIRED_REPLICA_COUNT]

...

resources:
  requests:
    cpu: [VCPUS_PER_MACHINE]
Then deploy the deployment and service as follows:
kubectl apply -f infra/bigtrace/gke/worker-deployment.yaml
kubectl apply -f infra/bigtrace/gke/worker-service.yaml
Deploying Clickhouse
Build and upload the Clickhouse deployment image
This image builds on top of the base Clickhouse image and provides the necessary Python libraries for gRPC to communicate with the Orchestrator.
docker build -t clickhouse infra/bigtrace/bigtrace_clickhouse

docker tag clickhouse [ZONE]-docker.pkg.dev/[PROJECT_NAME]/[REPO_NAME]/clickhouse

docker push [ZONE]-docker.pkg.dev/[PROJECT_NAME]/[REPO_NAME]/clickhouse
To deploy this on a pod in a cluster, the provided yaml files must be applied using kubectl e.g.
kubectl apply -f infra/bigtrace/clickhouse/clickhouse-config.yaml

kubectl apply -f infra/bigtrace/clickhouse/pvc.yaml

kubectl apply -f infra/bigtrace/clickhouse/pv.yaml

kubectl apply -f infra/bigtrace/clickhouse/clickhouse-deployment.yaml

kubectl apply -f infra/bigtrace/clickhouse/clickhouse-ilb.yaml
With the clickhouse-deployment.yaml you must replace the image variable with the URI to the image built in the previous step - which contains the Clickhouse image with the necessary Python files for gRPC installed on top.
The env variable BIGTRACE_ORCHESTRATOR_ADDRESS must also be changed to the address of the Orchestrator service given by GKE:
 containers:
      - name: clickhouse
        image: # [ZONE]-docker.pkg.dev/[PROJECT_NAME]/[REPO_NAME]/clickhouse
        env:
        - name: BIGTRACE_ORCHESTRATOR_ADDRESS
          value: # Address of Orchestrator service
If you want to verify whether the deployments were successful you can run:
kubectl get deploymentsWhich should generate an output similar to this:
NAME           READY   UP-TO-DATE   AVAILABLE   AGE
clickhouse     0/1     1            0           106s
orchestrator   0/1     1            0           48m
worker         0/5     5            0           27m
This means the orchestrator, workers and clickhouse have been deployed successfully.
File summary
Deployment
Contains the image of the Clickhouse server and configures the necessary volumes and resources.
Internal Load Balancer Service (ILB)
This Internal Load Balancer is used to allow for the Clickhouse server pod to be reached from within the VPC in GKE. This means that VMs outside the cluster are able to access the Clickhouse server through Clickhouse Client, without exposing the service to the public.
Persistent Volume and Persistent Volume Claim
These files create the volumes needed for the Clickhouse server to persist the databases in the event of pod failure.
Config
This is where Clickhouse config files can be specified to customize the server to the user's requirements. (https://clickhouse.com/docs/en/operations/server-configuration-parameters/settings)
Accessing Clickhouse through clickhouse-client (CLI)
You can deploy Clickhouse in a variety of ways by following: https://clickhouse.com/docs/en/install
When running the client through CLI it is important to specify: ./clickhouse client --host [ADDRESS] --port [PORT] --receive-timeout=1000000 --send-timeout=100000 --idle_connection_timeout=1000000
Deploying Superset
There are two methods of deploying Superset - one for development and one for production.
You can deploy an instance of Superset within a VM for development by following: https://superset.apache.org/docs/quickstart
You can deploy a production ready instance on Kubernetes across pods by following: https://superset.apache.org/docs/installation/kubernetes
Superset can then be connected to Clickhouse via clickhouse-connect by following the instructions at this link, but replacing the first step with the connection details of the deployment: https://clickhouse.com/docs/en/integrations/superset